You can find this section under Interface & Design > Banners in the IRP Admin left navigation menu.
Banners remain one of the most important merchandising tools in eCommerce because they sit at the intersection of user experience, navigation, marketing, and conversion.
Effective banners also play a direct role in increasing conversion rates across domestic and international storefronts. They improve product discovery, reinforce marketing campaigns, and influence local purchasing decisions through clear calls to action, urgency, and value-driven messaging.
Banners exist in multiple strategic locations through the IRP Shopping flows and specific locations are available for Mobile, Desktop and Trade shopping flows.
Banners Administration
Use the Search bar to find any banner. If you expand the search using the ‘+’ you can choose to show only Active, Inactive, both Inactive and Active, or Archived banners, Site type (Desktop & Mobile, Desktop, Mobile, Trade) banners, Banner locations and Country Targeting.
At the top of the screen you can use the following buttons:
- Add Banner: Click this button to begin creating a new banner.
- Banner Location Settings: Click this button to view all locations of banners across channels and attributes associated with banner locations. The button also shows the number of locations count (for Mobile, Desktop and Trader).
- Banners: Click this button to return the user to the full list of banners grid view.
The main grid shows the following details:
- ID: This is the unique ID of the banner in the IRP system.
- Active: This shows whether or not the banner is Active on the front end of the website. If you check or uncheck this box, make sure to click the Update Banners button.
- Location: This shows the location of the banner on the front end of the website. The location displays the name of the location and additionally shows location specific category usage or if the location is shown in checkout flows.
- Order: The display order in which banners will appear in relation to other banners of the same location type. The higher this number, the earlier it will be displayed in sequence. For example, a banner with an order of 1 will appear before those with an order of 2. You can use this column to quickly update the weight of all banners on the page instead of having to update each individual banner. If you make changes, remember to click the Update All Banners button.
- Site Type: This shows the channel type where the banner is used, either Mobile, Desktop, Desktop & Mobile, Trade
- Targeting: This shows the country count targeted for usage with the banner. The default is that ‘All Countries’ are targeted, but this can be updated to a specific set of countries (E.g. 7 Countries)
- Banner: This shows an image of the banner.
- Size: This shows the file size of the banner. The kb size of the banner is important to know as incorrectly sized banners can impact site performance.
- Last Updated: The date and time that the banner was last updated.
- Updated By: The name of the person who last updated the banner.
- Delete: A delete action used in conjunction with the ‘Delete Selected Banners’, button below the grid, that allows for a one or many delete banner action.
- Copy Button: Click this button to make a copy of an existing banner. By default, any copied banners will be inactive exact copies of the original banner.
- Edit Button: Click this button to make changes to an existing banner.
How to Add or Edit a Banner
To add or edit a banner, follow these steps:
- Go to ShopFront Design > Banners in the IRP Admin left navigation menu. To add a new banner click the Add Banner button above the Search bar. To edit a banner click the Edit button beside the banner that you want to edit.
- Banners have three tabs that are used to maintain details: Banner Details, Targeting and Scheduling.
- Enter or edit the following details on the Banner Details tab. If you see an asterisk (*) beside a setting it means that the setting is required. Note: The settings that you see depend on the Banner Location setting that you select.
- Click the Insert Banner button or the Update Banner button to insert the banners at the locations that you have selected.
- If you want to delete a banner, click the Delete Banner button at the bottom of the page.
- If you want to Preview a banner, click the Preview Banner button at the bottom of the page.
- If you want to Copy a banner, click the Copy Banner button at the bottom of the page.
Banner Details Tab
The Banner Details tab and section shows the main configuration details for the banner, including location type, channel, order and size.
- Banner ID: The banner ID with the IRP system.
- Active: The active status of the banner.
- Location: The location of the banner within the shopping or checkout flows, depending on the location selection additional brand and category selectors may become available to allow specific banner usage down to the brand-category level.
- Site Type: The site types are either Desktop & Mobile, Desktop or Mobile. Trade banners are handled directly from the ‘Location’ selection.
- Brand: If this is a brand-category or brand-specific banner, the brand component of this relationship.
- Category: If this banner is category-specific, this is the category that it relates to.
- Admin Name: The name of the banner for administration purposes.
- Display Order: The display order for the specific banner (when used in conjunction with multiple banners in the same location. Ordered by display order ascending.
- Content Size: The estimated KB size of the content displayed that includes images, css and javascript.
- Last Updated: The date, time and last person to update the banner content.
Location Settings
The Location Settings section shows an overview of the number of banners configured for this location, additional colour assignment, controls and animation details.
- Banners: The number of active banners in this location.
- Background: The background colour used when transitioning between banners in the same location.
- Selectors: The type of banner selection icons used when there is more than one banner in a location. Selectors are only available at the following locations: Top, Trade Top, Brand, Category and Brand-Category.
- Animation Type: The transition animation used in a location when there is more than one banner.
- Preview Location Button: A Preview modal window will display an example version of the banner with overall details of the banner. Users can switch between desktop and mobile views.
- Edit Location Settings Button: Each location can have its own specific settings that are applicable to all banners at this location, including, background, selectors, animation type.
Banner Content
The Banner Content section allows the user to maintain banner content in image and HTML format. There are additional settings to allow for the addition of placeholder dynamic content, images and URL links.
- Type: The type of content used to create the banner - either Image Upload or HTML Content.
- Background: The background colour of the banner (if required).
- Image: When the type selected is ‘Image Upload’ then this control allows for the selection of the image directly from the user's own computer. Note that adding a banner image will overwrite any previously-uploaded banner images. Also, language-specific banner images must be in the same format as the main banner image, e.g. .jpg, .gif, .png. etc.
- Language: The language of the selected banner from languages configured for the instance of the IRP
- Link URL: When the type selected is ‘Image Upload’ then a link URL can be added to link to another page within the IRP Shopper.
- Content: When type selected is ‘HTML Content’ the inline HTML editor allows the user to directly add and modify content to suit the message and brand requirements.
- Placeholders: When the type selected is ‘HTML Content’, Placeholders are tokens that can be added directly to the banners HTML to allow for the dynamic update of common content like Country Flag, Country Name, Free Shipping Threshold and Country Shipping From Value.
- Get Link: Use the functionality to select a specific page URL to make it easier to link banners to content.
- Upload Images: Upload images directly into the IRP to use as banner image content.
Targeting Countries Tab
The Targeting tab allows merchants to determine if a banner is available to all countries or if it is restricted to a specific country. This is particularly important in storefront localisation and multilingual support. For example, a merchant may create two banners that are identical except for the free shipping threshold in the UK and USA. In this case the merchant can easily create the two banners and make the necessary threshold changes, then target the banners to the UK or the USA.
- Targeting: Target specific countries that will show the banner.
Scheduling Tab
The Scheduling Tab allows a banner to be activated or deactivated at a specific time in the future. This allows you to cater for out-of-hours sales go-live preparation, for example. Select the day, hour and minute when this should happen. Note that the selected date must be in the future. If you want the banner to be activated at a future point, leave the banner set to Inactive. An 'uncache' is performed when a scheduled banner is activated or deactivated so that it will be immediately updated on the front end.
- Activation: Set the activation date and time.
- Deactivation: Set the deactivation date and time
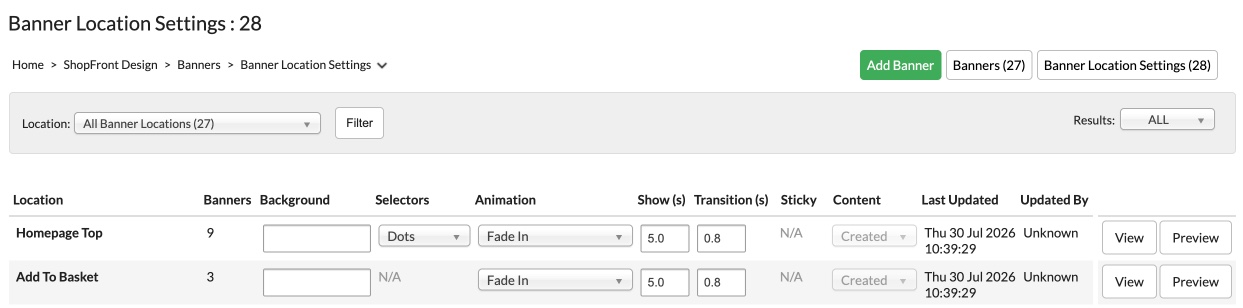
Banner Location Settings
Banner Location Settings allows merchants to easily control display attributes, animation and transitions for each of the 28 banner locations in the IRP Shopping and Checkout flows. Updates can be made to each of the location settings and updated in bulk using the ‘Update Location Settings' button.
Access the section using the 'Banner Location Setting' button above the search filter.
- Location: The location for this banner type.
- Banners: The number of banners at this location.
- Background: The background colour of the banner background.
- Selectors: The selector type when there is more than one banner at this location. Select from None, Bars, Dots, Number.
- Animation: The animation type for each banner at this location. Select from Fade In, Slide in Vertically, Slide in Horizontally, Cube, Cover Flow, Flip.
- Show(s): The time in seconds for the banner to show on the screen.
- Transition(s): The transition time in seconds between banners in the same location.
- Sticky: Where applicable this feature allows for banners to stick to the screen when the rest of the page is scrolled. It works well with Top page banners.
- Content: The type of content used at this location.
- Last Updated: The date and time that the banner was last updated.
- Updated By: The name of the person who last updated the banner.
- View Button: View a list of all the banners at this location in the 'Banner Location Settings' page.
- Preview Button: Preview the banner in a modal window and view between desktop and mobile views.
Banner Size Guidelines
- Mobile banner and image dimensions (width and height) should always be doubled so that they display clearly on retina screens.
- As a general rule, all images should be 'saved for web' from Photoshop or similar editing tools.
- Images can also be run through an image compressor such as https://kraken.io/web-interface before uploading - this cuts an average of 20% off images and makes for much faster page loads.
- Average banner size should generally not exceed 20kb.
- Maximum banner size should never exceed 100KB for large banners. If your banner is any larger than this then you probably have not run it through an image compressor and your site performance will begin to be impacted. Use the 'Inspect > Lighthouse' functionality in Google Chrome to analyse page load and identify images that may be impacting performance.
- To make the banner HTML fill all available banner space, a containing
div with a width of 100% and a height of 100% should be added to the banner content. The width of HTML banners will be stretched based on screen size in the same way as image banners when the "Stretch Banner" setting is ticked.
- It is the responsibility of the Admin User to ensure that HTML banner content is displayed within the banner dimensions. Any overflowing content will not be visible to customers.
- Please Note: When compressing images, make sure to compare before and after. It is important to cut down banner size without visibly degrading the quality of the images.
Banner Locations
The following table lists all 28 banners, their location and their recommended widths for your IRP Shopper storefronts.
| Type |
Mobile Rec. Width x Height |
Desktop Rec. Width x Height |
Description |
| Add to Basket |
400px x 400px |
500px x 500px |
Appears below the Buy buttons on the product pages. |
| Basket |
400px x 100% |
250px x 100% |
Full-width banner that appears below the basket summary on the basket page. Use this to add more payment reassurance and USPs. |
| Brand |
400px x 100% |
250px x 100% |
Appears at the top of the brand page. |
| Brand Category |
400px x 100% |
250px x 100% |
Appears at the top of the brand category page. |
| Category |
400px x 100% |
250px x 100% |
Appears at the top of the category page. |
| Checkout Login |
400px x 100% |
250px x 100% |
Appears on the Login page, above the title. |
| Floor |
70px x 100% |
70px x 100% |
This is displayed at the very bottom ('floor') of front-end pages. Optionally, you can make this 'sticky' so that it stays at the bottom of the customer's screen as they scroll. You can also make the banner appear on all the checkout flow pages by enabling the Show In Checkout setting. |
| Heading |
70px x 100% |
70px x 100% |
Appears below the top navigation section of the IRP, on all pages. This is usually where you put shipping USPs and so forth. |
| Homepage Top |
400px x 100% |
500px x 100% |
Appears centrally at the top of a homepage on the IRP, under the Heading banner. |
| Listing - Brand |
400px x 100% |
250px x 100% |
Appears at the top of the listings on brand pages. |
| Listing - Brand Category |
400px x 100% |
250px x 100% |
Appears at the top of the listings on brand category pages. |
| Listing - Category |
400px x 100% |
250px x 100% |
Appears at the top of the listings on category pages. |
| Model Page |
400px x 100% |
250px x 100% |
Appears below the product image and description in the models page. |
| Product Group |
400px x 100% |
250px x 100% |
Appears on Search Results pages as part of Product Group functionality. |
| Product Super Group |
400px x 100% |
250px x 100% |
Appears on Search Results pages as part of Product Super Group functionality. |
| Roof |
70px x 100% |
70px x 100% |
This is displayed at the very top ('roof') of front-end pages. Optionally, you can make this 'sticky' so that it stays at the top of the customer's screen as they scroll. You can also make the banner appear on all the checkout flow pages by enabling the Show In Checkout setting; this is intended to assist you with maintaining the display of important messaging throughout the checkout process. |
| Trade - Brand |
400px x 100% |
250px x 100% |
Appears at the top of the Trade brand page. |
| Trade - Brand Category |
400px x 100% |
250px x 100% |
Appears at the top of the Trade brand category page. |
| Trade - Category |
400px x 100% |
250px x 100% |
Appears at the top of the Trade category page. |
| Trade - Checkout Login |
400px x 100% |
250px x 100% |
Appears on the Trade Login page, above the title. |
| Trade - Floor |
70px x 100% |
70px x 100% |
This is displayed at the very bottom ('floor') of Trade front-end pages. Optionally, you can make this 'sticky', so that it stays at the bottom of the customer's screen as they scroll. You can also make the banner appear on all the checkout flow pages by enabling the Show In Checkout setting; this is intended to assist you with maintaining the display of important messaging throughout the checkout process. |
| Trade - Heading |
70px x 100% |
70px x 100% |
Appears below the top navigation section of the Trade IRP, on all pages. This is usually where you put shipping USPs and so forth. |
| Trade - Homepage Top |
400px x 100% |
500px x 100% |
Appears centrally at the top of a Trade homepage on the IRP, under the Heading banner. |
| Trade - Listing - Brand |
400px x 100% |
250px x 100% |
Appears at the top of the Trade listings on brand pages. |
| Trade - Listing - Brand Category |
400px x 100% |
250px x 100% |
Appears at the top of the Trade listings on brand category pages. |
| Trade - Listing - Category |
400px x 100% |
250px x 100% |
Appears at the top of the Trade listings on category pages. |
| Trade - Roof |
70px x 100% |
70px x 100% |
This is displayed at the very top ('roof') of Trade front-end pages. Optionally, you can make this 'sticky' so that it stays at the top of the customer's screen as they scroll. You can also make the banner appear on all the checkout flow pages by enabling the Show In Checkout setting; this is intended to assist you with maintaining the display of important messaging throughout the checkout process. |
